
Bike tires, Tubeless vs (tubes and tubular)
A look at tubeless tires for bicycles

The original standard: Tubes+tire
Tubes are the good old tubes you’re probably accustomed to. They’re easy, they’re cheap, they work, and they flat quite often.
Tubular
Tubular is just like tubes, except the tube is glued into the tire. Finally, the tire/tube are glued to the rim as well. This means there’s no friction as the tube doesn’t move at all inside the tire, and there’s low risk of pinch flats as well. However, the gluing process can be tedious, and when you flat, it’s a pain to fix.
Additionally, you can’t change the tire easily since it’s glued. So you need several trains of wheels. That’s expensive. Pros often use tubulars as they don’t care for the expenses and have a mechanic to do all the work. Several non-pro also use them, though.
For cyclocross, which run at low pressure and with relatively skinny (33mm) tires, tubulars are a good choice. You have no air leaks like tubeless may get at low pressure. Still, a good tubeless cylocross setup is not supposed to have air leaks even at low pressure.
Tubeless
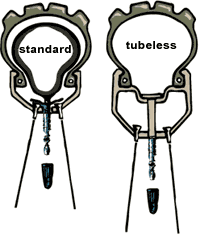
Tubeless are very similar, but you only get the tire, without a tube inside. It requires a removable valve, proper wheel rims (that will retain the tire properly), and tires that are, if possible, designed for tubeless (so that the bead of the tires seats well inside the rim/doesn’t move, to avoid air leaks).
Tubeless has no tube friction so the ride is a little better, and are filled with sealant and thus can resist some punctures. I’ve seen some roll over nails turned up without flatting. Finally, since there’s no tube, there’s no pinch flat. In fact, due to pinch flats and friction, cars also went to tubeless in the 1960?s an almost alls cars use tubeless nowadays.
Tire mounting issues
Tire levers
Generally tubeless tires that are much harder to install on the rims. Specially for cyclocross. If it’s that hard that you have to use a tire lever tool, make sure you never use the pointy part toward the inside of the rim. That can damage the rim, tire and tire lever. It’s a very common mistake. Always use the tool like if you were removing the tire, even for mounting. Eventually you’ll get the tire on.
Seating
The tires needs to be “seated”. Thats when you inflate the tire the very first time, it pushes the tire beads inside the rim edges. Since air leaks everywhere until it’s seated, you need a lot of air at once, very fast, to force the tire to seat in.
That’s impossible to do with a hand-held pump, not enough pressure. Most people in fact use a compressor (cost ~$100, or your local gas station).
Valves, cores, inflating with floor pump
Make sure you get long valves with a removable core (Stan’s notubes 44mm for example). Shorter valves will not accommodate floor pumps and compressors especially with the core removed, because there won’t be enough clearance.
When you remove the core of the valve, you can blow a lot more air at once, making seating easier. If you use a floor pump, most of them have a an inner pin that needs to be pushed it for maximum air blowing. With the valve core removed, the pin won’t get pushed.
Some buy expensive pumps that don’t have this pin, but really, you can just push the pin in manually and start locking the pump without mounting it on the valve. When the pin stays in place after you push it, just mount the pump on the valve and finish locking it. Works a treat!
Keeping it easy and cheap: co2, soapy water
Inflating with a floor pump may still be a challenge. In fact, it is for me nearly every single time. More than a challenge, it can be a pain, when the tire doesn’t wanna seat.
You’ll find many sites and video telling you to cover the bead of the tire with soapy water. It doesn’t work that well unless you also use a compressor. What seems to work better, is to use the soap water (only the bubbles, not the water) from dishes-grade soap. Then let it dry. It makes the rubber extremely sticky. This helps a lot.
Then, use a 16oz or more co2 compressor with a large valve (no pin inside). This works every time, just like the compressor. You can even keep the inner core of the presta valve in most cases.. in fact, I would often recommend it: with the core removed, once the co2 seated and inflated your tire, you’ll lose pressure and the tire will unseat.
With the presta valve the air stays in the tire so you can let it seat a while until the tire is well seated in the rim.
Sealant, etc.
Once the tire has been seated for a while, you can add sealant. It will ensure you get no air leaks, as tires & rims are rarely perfect. Plus, this will prevent many flats as well. Stan notubes is again, a well-known sealant.
Just unseat a part of the tire to put the sealant it, or better, if you did get a valve with a removable core, remove the core and pour the sealant in. Inflate the tire again, then shake it and turn it in all directions for the sealant to distribute everywhere. This takes a good few minutes. Hit the rim a few times and try to rip the tires a bit on the side to ensure you have zero leak.
The sealant will dry up after 2 month to a year depending on temperature, air being dry or wet, sealant brand (stan’s good), etc. When this happens you’ll have to refill the tire.
Let the tire sleep horizontally for a night before use. If it hasn’t lost pressure in the morning, you’re good to go :)
I flatted! I burped!
Burping means the tire “de-seated”, ie the bead moved and isn’t locked in the rim anymore, creating an air leak, thus flatting. That being said, if you roll on razors you might still really flat, too.
If that ever happens, no panic! ;-)
You can pour in more sealant and use a hand pump or better, a co2 canister to reinflate the tire. In most cases it works just fine. If you wanna be sure, you can also just carry a spare tube. The nice thing with tubeless, is that you can just remove the valve, and put a tube (making it a regular tube+tire wheel!), then get home and fix stuff later. featured
Comments